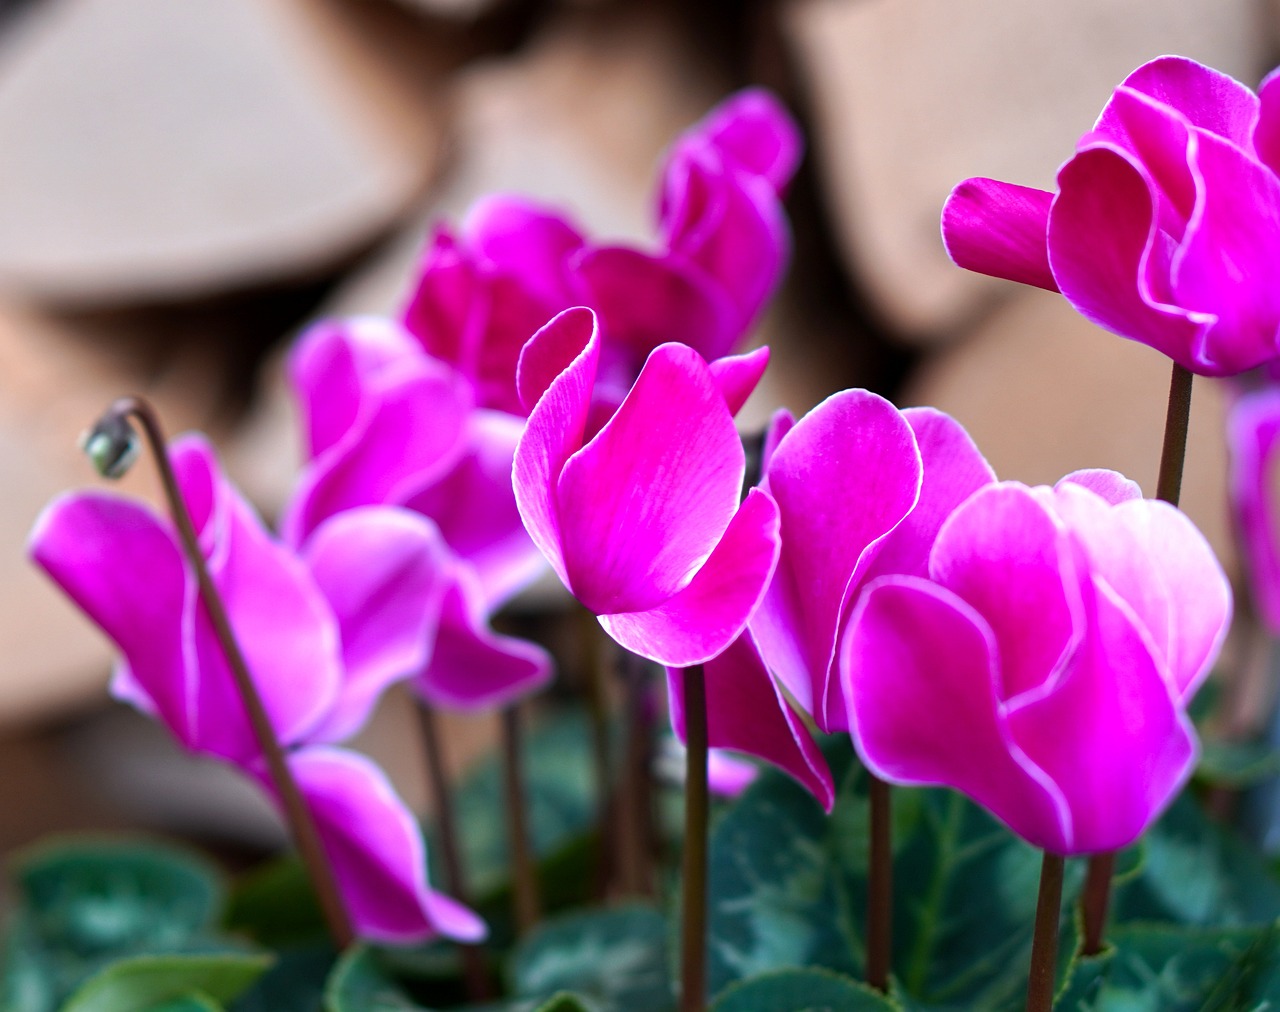
Posted on Leave a comment

How to grow herbaceous perennials

It’s the season to be planting herbaceous perennials – think delphiniums, ground cover clematis and iris. These glorious plants will give you great colour and interest in your outdoor space. Here are a few tips to make sure you get the best out of them. It’s important to select plants that are suitable for your soil type and garden conditions. Think about where you want to plant them and consider factors like sunlight exposure, moisture levels, and space available. Once you have decided, then it’s time to get planting!

Soil Preparation

  • Test your soil to determine its pH and nutrient levels.
  • If need be, use compost to get the right type of soil
  • Ensure you have good drainage to prevent waterlogging

Planting

  • Spring is a great time to plant them as the soil is manageable and temperatures are warmer
  • Dig a hole slightly larger than the plant’s root ball and place it at the same depth as it was in the container
  • Space plants according to their mature size and remember to take into account their spread!

Watering

  • Keep the soil consistently moist but not waterlogged, especially as the plant is initially bedding in
  • Water deeply and infrequently to encourage deep root growth.
  • Mulch around the base of plants to retain soil moisture and suppress weeds

Maintaining healthy growth

  • Regularly monitor plants for signs of stress, pests, or diseases
  • Deadhead spent flowers to encourage continuous blooming and prevent self-seeding
  • Divide overcrowded perennials every few years to maintain healthy growth and prevent them from becoming too congested

Feeding

  • Apply a balanced, slow-release fertilizer in spring to promote healthy growth
  • Avoid over-feeding, as excessive nutrients can lead to lush foliage but fewer flowers

Winter Care

  • Mulch around the base of plants in late autumn to protect them from freezing temperatures
  • Cut back dead foliage in late autumn or early spring to tidy up the garden and prevent disease

Support

  • Lots of herbaceous perennials can grow very tall. Make sure you have stakes or cages for tall or to prevent them from bending or breaking under their own weight

Enjoy the benefits of your labour!

  • Sit back and enjoy the beauty of your garden throughout the growing season and take time to observe pollinators and other wildlife that are attracted to your garden.
Posted on Leave a comment

Planting acid-loving shrubs

Planting acid-loving shrubs in pots isn’t much different from planting them in the ground, but it requires a bit more attention to soil acidity and container drainage. Here’s how;

Choose the Right Shrubs

Select acid-loving shrubs suitable for container growth – think azaleas, rhododendrons, blueberries, camellias, and gardenias.

Select the Right Containers

Use large, sturdy containers with drainage holes at the bottom. The pots should be big enough to accommodate the mature size of the shrub and allow for proper root growth. (and if you don’t have the right pot, we have plenty to choose from!)

Prepare the Potting Mix

Acid-loving plants thrive in acidic soil. Use ericaeceous compost which these kind of plants love. Avoid using regular garden soil, as it can become compacted and hinder drainage in containers.

Planting

Fill the bottom of the container with a layer of gravel or broken pottery to improve drainage. Then, partially fill the container with the potting mix. Carefully remove the shrub from its nursery container and place it in the centre of the pot. Add more potting mix around the root ball, ensuring that the top of the root ball sits slightly below the rim of the pot. Spread a thick layer of mulch over the surface to keep the compost moist.

Watering

Water the newly planted shrub thoroughly to settle the soil and eliminate air pockets. Keep the soil consistently moist but not waterlogged, as excessive moisture can lead to root rot. Water when the top inch of soil feels dry to the touch.

Proper placement

Place the container in a location that receives the appropriate amount of sunlight for the specific shrub that you have planted. Most acid-loving shrubs prefer partial shade or filtered sunlight, although some varieties may tolerate full sun or full shade.

Winter Protection

Well hopefully we’ve seen the last of the really cold weather but come winter you’ll need to provide protection for the shrubs. Wrap them in fleece or move them to a sheltered spot.

Posted on Leave a comment

Can I re-use compost?

If you’ve been growing bubs and bedding plants, you’re likely have some spent compost at the end of each growing season. To keep waste to a minimum, you can reuse this compost in the garden.

Here’s how;

Soil Amendment – Spent compost can be used as a soil amendment to improve soil structure, moisture retention, and nutrient content. Tip out spent compost, remove any large sections of root and work it back to a smooth texture. Then add handfuls of new compost working to a ratio of 70% spent compost to 30% new compost.  You can then mix it into garden beds, raised beds, or container gardens and it can help improve soil fertility over time.

Mulching – Spread the compost around plants as mulch. Mulching helps retain soil moisture, suppress weeds, and gradually release nutrients into the soil as it decomposes.

Composting – Although the used compost has already been through one cycle, it can still be added to a compost pile or bin. It will further break down and contribute organic matter to the compost, enriching it with nutrients.

Top Dressing – Use as a top dressing for lawns. It can help improve soil structure and fertility, leading to healthier grass growth.

Potting Mix- Mix it with other ingredients like perlite, vermiculite, and peat moss to create a custom potting mix for container plants. This mix can provide nutrients and improve water retention in pots.

Vegetable Gardens – Vegetable gardens can benefit from it as it will replenish nutrients depleted by previous crops. It can help improve soil fertility and support healthy plant growth.

Tree and Shrub Plantings – When planting trees and shrubs, mix some spent compost with the backfill soil. This can provide a nutrient boost to the newly planted specimens and improve soil structure around their roots.

However, remember to avoid using spent compost from diseased plants, as it may contain pathogens that could harm new plants. Additionally, if the spent compost was treated with chemicals or pesticides, it may not be suitable for use in gardens or edible crops.


Posted on Leave a comment

Taking dahlia cuttings

Bright, showy dahlias are a highlight of the late summer garden. You can increase your stock by taking basal cuttings from tubers in spring. Each tuber will give you around five new plants for free that will flower in summer.

Now we are in March this is a good time to pot up dahlia tubers (from storage or buy new ones), to bring them into growth, so you can have new shoots sprouting after a few weeks. Once healthy shoots have grown, leave some on the original tuber so that the plant can grow away strongly. Cuttings may wilt initially, but pot them up quickly and water well, and they’ll soon recover.

Rooting will occur after a few weeks, after which you can expect more substantial plants which will need potting on. Harden them off before planting in late spring after the danger of frosts has passed and give young shoots protection from insects and particularly slugs, which love to eat them.

You Will Need

· Dahlia tubers

· A sharp knife

· Multi-purpose, peat-free compost

· Seed trays or pots

· Hormone rooting powder.

· Horticultural grit

1. When stems reach 7 to 8 cm long, they should make good cuttings. Take a good look at the stems coming from your tuber and choose which stems to cut. You may need to push the compost aside so you can see where the stems emerge from the tuber. Stems that can be severed from the parent with a small amount of tuber intact are the first to try. This is because the growth hormones needed for good root development are concentrated in the tuber.

2. Take a sharp knife. This can be a gardener’s knife but a kitchen knife will also do. Ideally the knife should be clean and some growers advocate sterilisation through a flame. Hold the chosen stem and push the knife into the tuber and under the stem to cut it away.

3. If some of the light brown woody tuber comes with the stem, you have a perfect specimen. If not, don’t worry as the stem can still be used but you will need to cut the stem under a leaf node as shown in the first picture below. A leaf node is simple to spot as there is a swelling on the stem from which the leaves emerge. It should root anyway as there is also a concentration of growth hormones in the leaf node. If you want to you could dip the cut stem into some hormone rotting power or gel but this is not essential.

4. Carefully tear or cut away any lower leaves on the stem and cut the top leaves in half to reduce the amount of surface area through which moisture can be loss.

5. Fill a pot with compost. Place a pencil into the compost at the edge of the pot to make a hole and put the stem in, gently firming the soil around it. Three cuttings can usually be fitted around the edge of a 9cm pot.

6. Water the cuttings. They usually root without covering but if you have a propagator (plastic tray with or without bottom heat and with a clear plastic lid) you could use this. You could also try putting clear a plastic bag over the pot, held in place with a rubber band. Both methods reduce the moisture loss from the cutting but have the potential for the cutting to rot if the atmosphere is overly damp – so do not overwater.

7. Cuttings will take 2-4 weeks to develop roots. Resist the temptation to pull the stem to see if it has taken. You will know when it has worked as the stem will begin to grow new leaves. Alternatively, if you have some, use the see-through pots used by orchid growers, or even the plastic cups from children’s parties (with drainage holes punctured in the bottom) as you can see the roots growing without disturbance.

Posted on Leave a comment

Best plants for birds

Gardening with birds in mind is so important these days when small birds are challenged by problems such as climate change, habitat challenges and bird flu.

There are lots of great plants to grow in your garden and some of them provide fantastic food and shelter for garden birds as well. You don’t need to have a big garden to attract wildlife, you just need to think about what birds need and plan – and plant – accordingly.

Best trees for birds

Holly  – A holly tree provides great shelter during nesting season. Add to that the berries they produce during winter and you’ve got a tree that birds adore.

Fruit trees  – As well as attracting birds, fruit trees are great for insects and bees. They will pull in pollinators from far and wide which makes for a healthy, happy garden with plenty of fruit and flowers. If you’re short on space, you can buy dwarf trees and plant them in pots.

Amelanchier – Trees are great for providing shelter and protection for birds. Even if you have a small garden, do make room for one tree.  Amelanchier is a great choice. Birds love the little fruits it bears and it has gorgeous colour come autumn which you can admire.

It’s not just trees that attract birds, there are various shrubs that fulfil their needs too.

Sambucus – Elder As well as the birds loving this shrub, so do we! It’s a very easy going plant as it will flower year after year and is happy anywhere in the garden. It has very tasty shiny fruits in late summer, and insects love the spring blossom, which in turn attracts birds to feed on those insects.

Lavender – Lavender is one of those must-have garden plants that looks great planted on its own or with other plants. It’s a multitasker, providing cover for some birds and seeds for others!

Cotoneaster – Its not fancy but this shrub provides food and shelter – from it’s berries and it’s twiggy growth.

Barberry – Berberis Another shrub providing a combination of food and shelter. It’s not quite as ‘pretty’ as other shrubs but it’s attractive to birds nonetheless.

 Wisteria – Wisteria is definitely a looker! But its what underneath that counts and this is a cracking climber. With its woody growth and large leaves, it’s a fantastic shelter for all sorts of birds. Perfect for nesting, it also is a haven for insects, which keeps the birds fed and happy.

Ivy  – A familiar climber, the flowers of ivy attract insects and the birds that feed on them.  Its foliage provides cover for nests while the black berries are sustenance during winter

Sunflower – Once in flower, a very popular plant for birds and insects alike. Insects adore the pollen it produces and birds the seeds.

Ice Plant – Sedum – A classic addition to the late summer border, the Ice Plant is also a winner when it comes to bird life too. There are lots of varieties to choose from but go for a species rather than a hybrid if possible, such as sedum spectabile forms like ‘Autumn Joy’, as these will produce seeds which some birds like finches are drawn to. But it’s leaving the stems through the autumn that is crucial, providing a habitat for insects and foraging birds late in the season.

Ornamental grasses – Grasses with ornamental flower heads and foliage provide a fantastic food source for birds. In autumn and winter it has lots of tasty seeds and its stems make for excellent cover. By spring its stems and foliage have died off but are ideal for building nests.

Lawn flowers – Gone are the days of a perfectly mowed lawn! If you can manage, give the grass a cut every few weeks. Clovers, dandelions and daisies will appear and it will be heaven for insects thereby attracting the birds.

Thistles – Thistles can get a bit of a bad rep but birds love their seeds. Eryngium is a particular favourite here at The Green Room as it comes in a range of sizes so can fit into the smallest of spaces.

If you need any help choosing plants to attract birds to your outdoor space, get in touch, we’d love to help.

Posted on Leave a comment

Creating a pollinator friendly garden

Creating a pollinator-friendly garden involves providing a diverse range of plants, habitats, and resources that attract and support pollinators like bees, butterflies, and hoverflies. Here are some tips to make your garden more pollinator-friendly:

Plant a Variety of Flowers – Choose a variety of flowers with different shapes, colours, and bloom times to attract a diverse range of pollinators. Native plants are often well-adapted to local pollinators, so include some in your garden.

Include Pollinator-Friendly Trees and Shrubs – Trees and shrubs such as fruit trees, hawthorn, and hazel can provide additional food sources and nesting sites for pollinators.

Provide a Water Source – Set up a shallow dish with water, stones, or floating vegetation to provide a water source for pollinators.

Create Nesting Sites – Leave some areas of the garden undisturbed to provide nesting sites for bees and other ground-nesting insects.  You can also install bee hotels or nest boxes for solitary bees.

Avoid Pesticides – Minimise your use of pesticides, especially those containing neonicotinoids, which can be harmful to pollinators.

Plant Herbs – Herbs like lavender, thyme, and mint are not only aromatic but also attract pollinators.

Encourage Wildflowers – If you have the space let some areas of your garden to grow wild with native wildflowers, which can be particularly attractive to pollinators.

Get the timing right – Plant flowers that bloom at different times of the year to provide a continuous food source for pollinators.

Consider Vertical Gardening – Vertical gardening is proving ever more popular. Utilise vertical space by growing climbing plants and installing hanging baskets to maximize flower coverage.

Provide Sun and Shelter – Many pollinators, especially butterflies, benefit from sunny spots for basking and sheltered areas to escape from strong winds. (and lets be honest – Scotland has a lot of strong winds!)

Mulch Wisely – Use organic mulch to retain soil moisture and suppress weeds, but avoid excessive mulching in areas where ground-nesting bees may need access to the soil.

Even by adopting a few of these tips, you can create a welcoming environment for pollinators and contribute to their conservation.  Alongside this, a pollinator-friendly garden enhances biodiversity and promotes a healthy ecosystem.

Posted on Leave a comment

Meet Caitlin

We caught up with Caitlin, the newest member of the Green Room team and found out a wee bit more about her!

What attracted you to a career in floristry?

I love getting the chance to be creative therefore I was immediately attracted to a career in floristry. Getting to create different types of arrangements every day and experiment with colour and form always keeps it exciting.

What is your ideal flower arrangement?

My ideal floral arrangement would be a simple vase arrangement with a natural colour palette i.e greens, whites and yellows. Waxflower is one of my favourites as it not only looks good but also has a beautiful scent, so this would be a must-have in my arrangement.

What’s the one top tip for looking after your flowers?

Where you place your flowers in your home is crucial. You should avoid placing them in a space where they would be exposed to things such as direct sunlight, radiators and draughts. The cooler the flowers are kept the longer they will last.

If you hadn’t become a florist, what would you be doing?

I studied Fine Art at university so I would like to think that I would be doing something related to that. Whether that be taking painting commissions, teaching art classes or hosting exhibitions. I would be happy doing anything creative!

Posted on Leave a comment

Where should I place my bird box?

Placing bird boxes in suitable locations is crucial to attract and provide a safe environment for birds. Different bird species have different preferences for nesting sites, so it’s essential to consider the needs of the birds you want to attract. Here are some general tips:

Height

Most bird boxes should be mounted at a height of 2 to 4 meters above the ground. This height helps protect the birds from predators while providing easy access for the birds to enter and exit.

Orientation

Position the bird box facing between north and east to avoid the prevailing wind and strong sunlight. This helps regulate the temperature inside the box.

Protection from Predators

Ensure that the bird box is not easily accessible to predators like cats or squirrels. Consider adding a predator guard or placing the box where predators cannot easily reach.

Distance Between Boxes

If you plan to install multiple bird boxes, make sure they are spaced well apart to avoid territorial conflicts between nesting birds.

Vegetation

Birds often prefer boxes placed near vegetation for protection and camouflage. However, make sure there are no branches or plants blocking the entrance.

Quiet and Undisturbed Area

Choose a quiet and undisturbed location to minimize human disturbance. Birds prefer areas where they feel safe and secure.

Openings and Clear Flight Paths

Ensure there are no obstacles blocking the flight path to the entrance hole. Also, check that the entrance hole is the right size for the specific bird species you want to attract.

Proximity to Food and Water Sources

While not a strict requirement, placing bird boxes near food and water sources, such as bird feeders or birdbaths, can increase the chances of attracting birds.

Monitor and Maintain

Regularly monitor the bird box to check for signs of wear and tear, and clean it out after each nesting season. This ensures the box remains a suitable and safe environment for birds.

Make sure you research the particular needs of the bird species you want to attract, as different species have different requirements. Additionally, local environmental conditions may influence the suitability of a particular location.

Posted on Leave a comment

Protect your plants from frost

Last year December’s cold snap was devastating for a lot of plants. The heavy rainfall in November followed by a cold snap in December meant that our borderline hardy evergreens were hit hard.

With temperatures now falling, and dipping below zero across Scotland, it’s important to protect plants that hail originally from warmer climes. They need to be moved under cover, into a cold frame, conservatory, mini greenhouse, porch, shed or greenhouse, or given some protection outdoors.

Which plants should you protect from a cold snap?

The plants you need to protect (to name a few) include;

  • Rosemary
  • Phormium
  • Cordyline
  • Lavendar
  • Ceanothus
  • Cistus
  • Camellia

If you’re in doubt, come and ask us, we can advise on any plants that may need protected.

What to do now

It’s important to mulch, fleece and wrap your susceptible plants and pots as soon as cold weather is forecast.  Bring tender plants inside into conservatories, greenhouses, or homes.

Repair greenhouses, mending cracks and gaps. Use fleece and recycled bubble wrap to fend off cold. This also helps to keep plants dry.

Gather frost prone produce i.e. beetroot, celeriac, and scabbage – and store under cover. You can leave carrots in the ground but cover them with cardboard as they taste best if left in the soil. It is worth covering winter leeks and parsnips so that some can be lifted even in a bad frost.

Give evergreen branches a shake after snowfall, as they can snap if weighed down too heavily. Deciduous plants aren’t so much at risk of damage as without their leaves the snow will fall straight through.

Watch your wildlife

By leaving vegetation for as long as possible before clearing it, gives wildlife a chance and provides shelter for insects and food for birds.

Top up bird feeders and position bird boxes to shelter birds and enable them to identify nesting sites in good time.

If it’s cold enough that you think your pond may freeze, pop a floating ball in it.

As ever, if you’ve any questions please do come and talk to us, we’re happy to help!